Written by Nick McCamley on 01 July 2000.
On 18th August 1939, the Air Ministry sought approval to acquire the disused Glynrhonwy Isaf slate quarry which had closed in 1930; the quarry, near Llanberis in North Wales, was deemed suitable for the storage of 18,000 tons of bombs. It consisted of a number of deep open pits, linked together by tunnels. Following the apparent success of the design employed at Harpur Hill in Derbyshire, the air ministry decided to use the same technique at Llanberis, converting the eastern pit into an underground depot, but because of the great depth of the quarry the design was adapted to produce a structure with two floors throughout. The lower level and a conventional flat reinforced concrete ceiling which also formed the floor of the upper level which had an arched roof like that at Harpur Hill. Standard and narrow gauge railway lines entered the lower level of the depot through the original quarry access tunnels, while three electric lifts transported bombs to the upper floor. The deep pits to the west of the depot were later used for burning and dumping redundant and dismantled ordnance.
Overhead protection was given by forty feet of broken slate. In response to pressure from the treasury efforts were made to cheapen and accelerate the construction of Llanberis, but unfortunately the cost cutting had disastrous consequences only six months after the depot was opened.
On 25th January 1942, two-thirds of the structure collapsed within seconds under the weight of the overlaying backfill, completely engulfing a train of twenty seven wagons which was in the process of unloading. The collapse buried over 14,000 tons of bombs which at the time represented 14% of the total RAF stock. A court of inquiry concluded that faulty design was the principal cause of the failure; cracks were noticed in the structure as the building neared completion but these were attributed to minor defects rather than to a major and fatal miscalculation.
Most of the bombs were recovered and although the remaining tunnels were eventually cleared of debris, no ammunition was ever stored underground at Llanberis again. The surviving underground galleries were abandoned and the collapsed section was used for open storage of incendiaries and as a demolition area with ordnance being dumped in the pits to the rear of the depot.
The depot remained in use after the war but all functional stock was removed by March 1955 and the depot closed in July 1956.
This wasn’t, however, the end of the story. After the war there was long term activity at Llanberis, in the form of a small RAF detachment of bomb disposal people, patiently clearing dumped weapons. After the war large quantities of incendiaries were dumped into the pits, some water filled, to the rear of the main storage area.
The following text was taken from the book ‘Designed to Kill’ by Major Arthur Hogben,
“The demolition and burning of explosives within the quarry area started in June 1943 when the Royal Air Force School of Explosives moved to the site. The school curriculum included the destruction of explosives, so large quantities of bombs and pyrotechnics were brought in for demolition or burning. The destruction of explosives continued until July 1956 when the site was closed. Included in the destruction programme was virtually every type of explosive item on the Royal Air Force wartime inventory. Unfortunately, as sometimes happens with mass demolition, a proportion of the items were not completely destroyed. Thus this large and practically inaccessible complex of quarries was known to contain quantities of explosive items. As such the site solicited a certain amount of indiscriminate dumping of unwanted or recently recovered explosive items. The shape of the site was such that much of the explosive material dumped ended up on ledges and slate outcrops, never reaching the quarry bottoms. More still had been dumped or fallen into the lakes, which had formed in the quarries during the years of inactivity between 1956 and 1969.
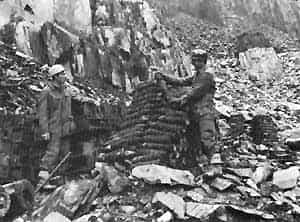
In 1969 a decision was taken to clear the entire site of explosives and explosive debris. The task was given to 71 Maintenance Unit EOD Flight from Royal Air Force Bicester. By the time the task was completed in October 1975 the personnel of the Flight had become expert in lifting tons of explosives from the quarry pits and lakes and in the handling of special mechanical equipment. They had also learnt the arts of tunneling and rock climbing, which in the earlier days had been the only ways of gaining access to some of the pits and their surrounding ledges. This must have been one of the few bomb disposal tasks carried out by any Service where members of the unit had first to be instructed by a Mountain Rescue Team. The various rock climbing techniques and rescue procedures taught were essential to enable members of the unit to reach much of the explosive ordnance with which they had to deal.
From 1969 onwards, the various pits and tunnels were progressively cleared. Members of the EOD Flight burrowed further and deeper into the debris and slate rubble to uncover such items as incendiary bombs and high explosive bomb detonators. The latter, together with the numerous bomb fuses, which were uncovered, were in an extremely hazardous condition and required careful handling. With the help of the Royal Engineers, roads were constructed into the more difficult pits.
Royal Navy divers were co-opted to investigate the contents of a large lake in one of the pits as it was suspected that it might contain some explosive items. The divers reported that the bed of the lake was littered with explosive items including a number of large bombs. Subsequently, over 20,000,000 gallons of water and sludge were pumped out. By April 1973 the lake was emptied revealing everyone’s worst fears; it took a further two years to recover and dispose of the explosive items revealed. Fortunately, this pit was one of those to which 38 Engineer Regiment, RE, had constructed a road, otherwise the task would have been impossible.
On completion of the task, 71 Maintenance Unit EOD Flight had moved approximately 85,000 tons of slate and debris, recovered and disposed of 352 tons of explosive items together with 1,420 tons of non-explosive ordnance debris.”
Sources:
- Secret Underground Cities by NJ McCamley ISBN 0 85052 585 3
- The Slate Regions of North and Mid Wales by Alan John Richards ISBN 0 86381 552 9
- Designed to Kill by Major Arthur Hogben ISBN 0 85059 865 6
- subwales.co.uk
Written by Bob Hankinson on 01 July 2000.
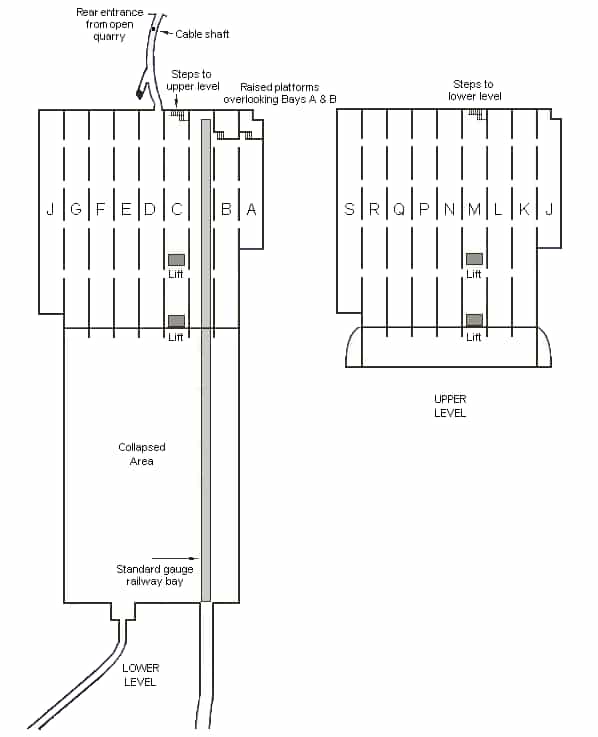
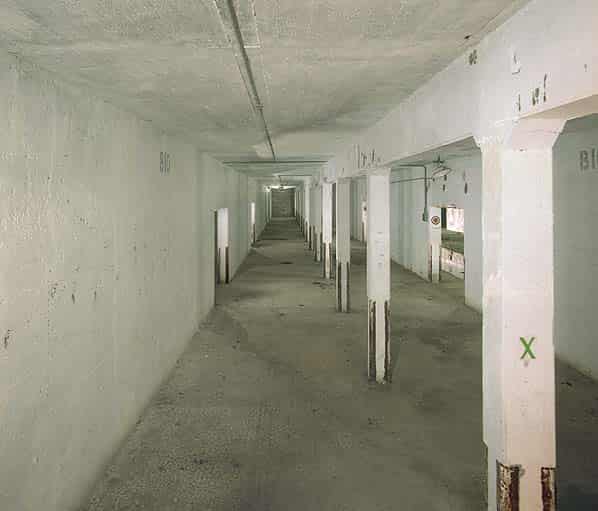
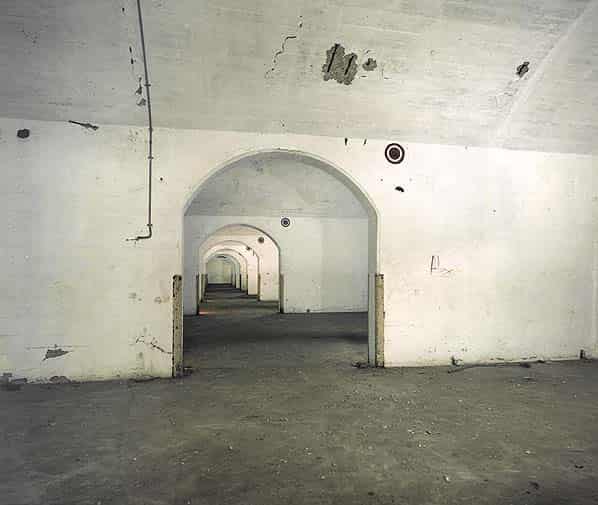
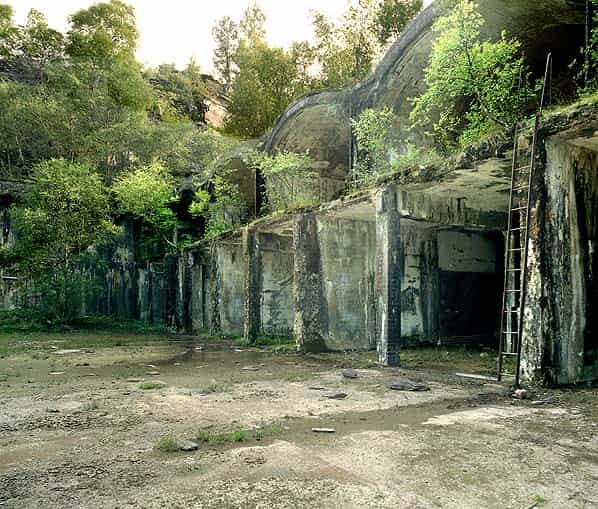
The obvious part of the site resembles eight parallel railway tunnels opening out into a vast concrete lined tank about 100 metres by 60, with walls 12 metres high; this was the area of the collapse that was subsequently cleared. Inside, the remaining galleries are very dry, clean and in good condition, with limited graffiti and no vandalism and little litter; the walls in the tunnels are all painted white. The lower level is about 15 feet from floor to ceiling, with walls running the full length separating the galleries.
Each gallery is about 24 feet wide and over two hundred feet long, ending in a thick brick wall, which was built to separate the surviving galleries from the collapsed area. There is a wider area between gallery B and gallery C which brings a sunken standard gauge railway line into the storage area, the floor of the depot acting as a loading platform either side of the line. Except in this wider gallery, concrete pillars about 12 feet apart run down the centre, supporting a concrete beam running the length of each gallery. These help to support the ceiling, which forms the floor of the level above. They are apparently original, because each corner has a steel rubbing piece built in, as do the other openings but not the brick reinforcements seen in some places, which I believe to have been installed as strengthening after the collapse. The sidewalls have square openings about 15 feet wide every so often, some of them bricked up. The galleries are lettered A to H on the lower level and J to S on the upper level.
Each gallery was numbered into eleven bays. The bay numbers can be clearly seen on the walls, but there is no divider between the bays except a red roundel painted high on the wall midway between the numbers. The numbers run from 6 to 11 on upper and lower levels, leaving bays 1 to 5 in the open area where the collapse occurred. Roughly two thirds of the original underground area is now open to the air (the ‘tank’).
There are two galleries to the right of the railway line, A and B downstairs and J and K upstairs. The furthest right is J gallery upstairs. A / J is much shorter than the other galleries. It has only bays labeled J8, 9 and 10. At the back, part of the floor is raised with steps up to it and this is a blind gallery, running forward only as far as J8. The others all run from 11 to 6 before ending in the brick wall, but for gallery J there is no brick wall and no external sign at all. J10 is also not full width. My guess is that the original quarry was slightly wider here, and the builders took advantage of the extra space.
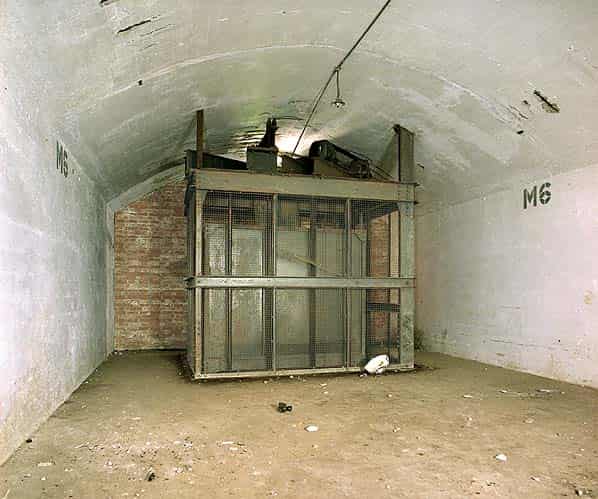
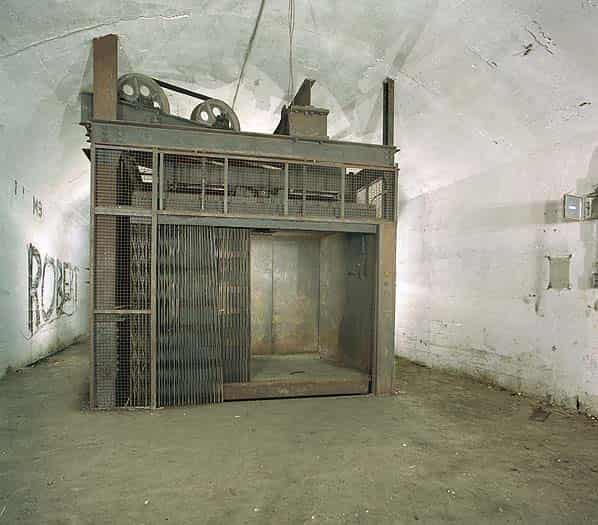
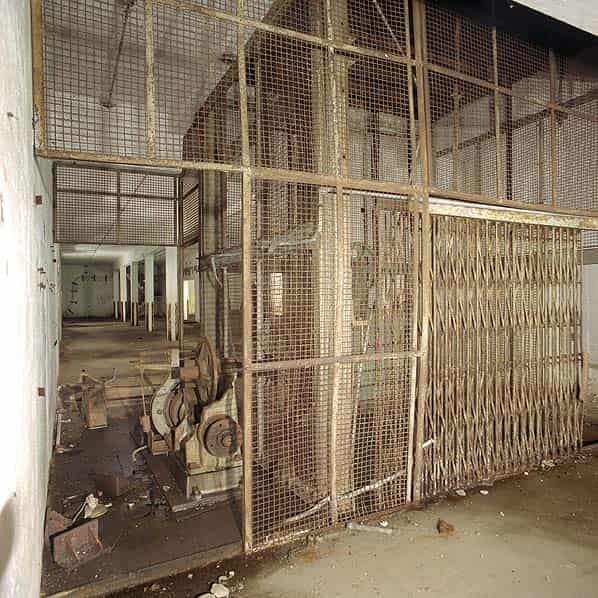
Gallery M has two lifts. One is at C6 / M6, hard up against the brick wall and barely any use. Surprisingly, no effort appears to have been made to open the other side of the lift so that it could have been used more readily. As the brick wall was built after the collapse this may confirm that the remaining underground section of the depot was abandoned. The other lift is at C9 / M9. A third lift was in the collapsed section and has been lost. The wiring is very old, gutta percha insulation and no sign of post-war modernisation.
The upper level galleries are the same width as the lower, but they have an arched roof and there is no line of central pillars as in the lower galleries. The doorways between the galleries are smaller than below, and arched rather than square. Several have been reinforced after the original build with four courses of brick, also formed into an arch, but without the steel corners seen on the original concrete construction. This brickwork narrows the opening from 12 foot to six foot wide, and drops the height of the arch from 11 to 7 foot. Around M, N and P several of the archways are completely bricked up. There is a single staircase between lower and upper levels, at C11.
There are some few electrical fittings left. Mains power came in through the back tunnel where there is a vertical cable shaft. Most of galleries show signs of tubular conduit for hanging lights, and a few of the reflectors remain. All of the switches have gone, except the casing of one which shows clearly that it was of the type used in explosives stores, which contains the spark inside the housing.
Two bits of official graffiti have been painted on neatly, and again are likely to date from 1942. They say that the practice of spitting is disgusting and must cease. Anyone caught spitting will be dismissed. This points to a mainly civilian workforce, since dismissal is not the term that would be used for a serviceman facing a charge.
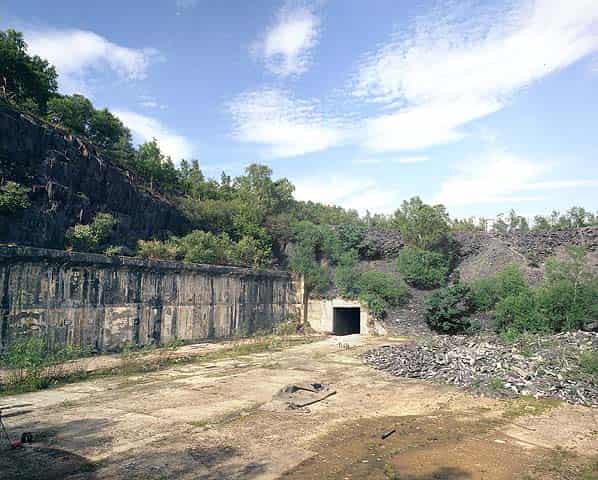
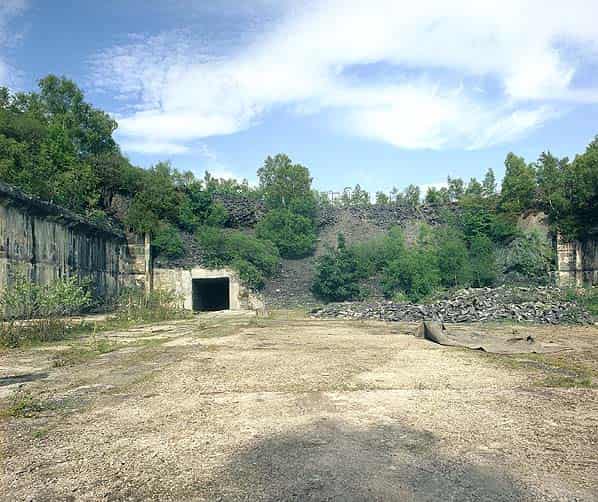
There are three tunnels leading to the main storage space. Two open into the ‘tank’; the open part where the collapsed concrete, bombs and slate backfill have been removed. The main access tunnel is about 15 feet wide, square section part of the way and is arched the rest. The northern tunnel was adapted to take a standard gauge railway line during the construction of the depot. It is quite short with a bend and has been shotcreted, probably after the closure of the depot.
The southern access tunnel is smaller and originally took a narrow gauge quarry tramway into the eastern pit; although it can still be entered from the depot, the other end has been backfilled with waste stone. After the bend the tunnel is concrete lined and arched, with signs of decay in the concrete. Reinforcing rods could be seen, about 3cm thick and 12 cm apart. When the slate quarry was still in use these tunnels served the Glynrhonwy Isaf mill on the west side of the A4086. The mill was extended and altered for munitions manufacture and has now been rebuilt for industrial use. The tramway originally continued to Llanberis Lake which was used for tipping slate waste.
The third tunnel is at the back of the storage area in gallery D, and is mostly unlined rock. It is about 7 feet high. The floor is very rough concrete, but there are rotten wooden sleepers set into the concrete. An open water channel runs on one side, with water running into the workings to the start of the tunnel, where it drops into an inspection pit and is carried away in a large earthenware pipe about a foot in diameter. It is the noise of this falling water that you hear throughout the upper galleries, sounding at first as if fans were running. At the bend of the tunnel, the straight passage is bricked off, while the open tunnel bends to the left and goes into the open air past a vertical shaft up which power cables ran. As well as forming the emergency exit from the depot this tunnel was also used for the painstaking removal of the munitions after the collapse. Significantly, the floor of this tunnel is not level with the floor of the storage galleries, being about a foot higher. This would have added to the handling problems getting the munitions out in the recovery operation.
The back pit is about seventy feet deep and maybe 100 feet square. Off to the right is another adit, leading slightly downwards and filled with water, with no sign of an exit. Each of the eight or more pits in the old quarry was linked by a similar tunnel.
Back outside in the ‘tank’, there is little to see. The space between the railway platforms has been filled with rubble and floor was clear but has had a quantity of spoil tipped there. On the walls are the remains of wooden signboards every few feet, which would have been bay labels (unlike the ones inside, which are painted). This confirms that the cleared open area was used from 1943 for storage of incendiaries.
Written on 31 August 2003.
In August 2003 the two access points into the surviving underground section of the depot were grilled and gated in an attempt to prevent access into the tunnels.
Written by Martin Briscoe on 23 June 2023.
Much of the contents of the Glynrhonwy Bomb Store were moved to Bronydd Bomb Store after the collapse.
The NECACO site across the main road, by the railway at SH 57165 61014, was used for building Lancaster bombers during WWII.
The Chemical Weapons recovered from Germany were brought by ship to South Wales then by rail to here before bring transferred by road to RAF Llanwrog.