Beacon Hill Fort is located on a natural south-east facing promontory on the south side of the Orwell Haven comprising the estuaries of both the River Orwell and the River Stour. The first attempts to fortify the estuary can be traced back to Roman times while in 885 King Alfred brought his fleet from Kent to the Haven where he defeated the Danish navy at ‘Bloody Point’ near Shotley. After 1320 Harwich was attacked on seven occasions in 50 years, mainly by the French and the Dutch.
During the reign of Henry VIII the town was chosen as the site of a new naval base. Two new forts were proposed, one at Beacon Hill, to the south of the estuary and one at Languard Point to the north. Neither of these forts was constructed at this time; instead three small blockhouses were built, one of which was at Beacon Hill because of its strategic location being a good vantage point out to sea and inland. Ten years later however, the blockhouse at Beacon Hill had been abandoned and the guns removed.
After the death of Henry VIII the guns from the blockhouse at Landguard Point were reinstalled at Harwich and the town itself was further fortified. With the threat of war with Spain a second blockhouse at Beacon Hill was proposed together with further strengthening of the fortifications around the town but these new fortifications quickly fell into decay and by 1625, Harwich was considered to be defenceless.
New works were proposed during the Civil War but little was done at Beacon Hill until the second Dutch war in 1665 when a small battery was constructed on the headland and in 1708 plans were drawn up for a small fort on Beacon Hill but with the decline in importance of the naval yard these were not implemented with Landguard Fort considered sufficient to defend the estuary. In 1745 a small battery was built to supplement these defences on a site later occupied by the Harwich Redoubt.
In 1804 a masonry tower was built on Beacon Hill and six years later the Harwich Redoubt was built 100 metres to the north west of the fort. This was equipped with ten 24-pounder guns with a further three 24-pounders mounted in a small battery to the west of the town and a further five 24-pounders at Angel Gate Battery to defend the harbour. In 1812 a small battery with five 24-pounders was also built on Beacon Hill.
By 1822 the battery had been washed away by coastal erosion and although a replacement was planned in 1839 it wasn’t built.
Following an inspection of fortifications in 1853, General Burgoyne considered the only useful defence to be the redoubt. He made numerous suggestions to improve the defences of Harwich and the estuary but a lack of money scuppered all these proposals until 1862 when the redoubt was rearmed with three 8-inch SB (smooth bore) guns and seven 68-pounders with three 68-pounders for Angel Gate Battery. The SB guns were obsolete by the time they were installed and were soon replaced with 9-inch RML’s (rifled muzzle loaders) to compliment those that had been mounted at Shotley Battery (on the north side of the Orwell) and at Landguard Fort.
By the 1880’s the fortifications were once again considered obsolete and in 1887 The Stanhope Commission recommended the construction of a new fort at Beacon Hill, work started on 10th January 1889.
By this time improved artillery on battleships meant that forts like Languard with its outdated RML’s could be easily attacked and destroyed so a new innovation in fort design was used incorporating the fortifications into the surrounding landscape making them almost invisible from the sea. This replaced the traditional and highly visible ditch and rampart defences as used at Landguard Fort on the north side of The Haven which was built ten years earlier. The new design also incorporated a low artificial hill behind the emplacements. This provided a natural backdrop that helped camouflage the guns and protected the gunners backs from an attack from the rear.
It also housed the engine room, magazines and a dugout for the defending infantry forces. To the rear of the fort the ‘Twydall Profile’ was adopted. This was developed a few years earlier at the Twydall Redoubt at Chatham and at Beacon Hill it consisted of a network of banks and ditches at the rear of the fort with a gently sloping glacis down to the bottom of a ditch containing a concealed unclimbable fence; this enabled infantry to defend the landward side.
The fort was designed to mount a single 10-inch breach loading gun on a hydro-pneumatic disappearing carriage and a 6-inch breach loading gun on a disappearing carriage.
The guns would rise up above the pits for twenty seconds to fire; the recoil would force them down again out of sight ready for reloading. There were also two 4.7 inch QF (quick firing) guns on barbette mountings within the fort which was fully armed and operational by 1892.
Within a few years two 3-pounders were added to provide flanking fire for the larger guns and a practice battery of four 5-inch Vavasseur guns was constructed to the west of the fort. By this time the Harwich Garrison, incorporating all the fortifications for the estuary, numbered five thousand men.
By the turn of the century, with the increased threat from the German navy, the fort was further extended with a new emplacement on the north side for a 6-inch BL (breech loading) gun and following the Owen Report in 1904 the 10-inch and 6- inch emplacements were rebuilt to take 6-inch Mark VII guns to supplement the existing 6-inch BL and 4.7 inch QF guns.
Harwich was in the front line defences during WW1 and Beacon Hill Fort was once again improved with the addition of two 1-pounder automatic guns for anti aircraft defence. During this period the town and surrounding area was designated a Class A fortress capable of withstanding a German attack; the attack however never came.
After the war the redoubt was disarmed and sold to the council and the 4.7-inch guns were removed from the fort.
With the further threat of war with Germany in the 1930’s, plans were drawn up to reactivate and rearm the fort but it wasn’t until 1940 that any new works were started with the construction of the Cornwallis Battery which consisted of a twin 6-pounder emplacement with a rangefinder and predictor tower at the rear.
With the depletion of the German navy a seaborne attack was eventually considered unlikely but with the increased threat of an air attack by the Luftwaffe the air defences at the fort were improved with flat-roofed concrete casemates constructed over the two 6-inch Mark VII guns, there was also a Bofors anti-aircraft gun added to the roof of the southern emplacement. A battery observation tower was constructed on top of the abandoned 4.7-inch emplacement, and a brick tower was constructed north of the fort for use in the early developments in radar at Bawdsey. The 6-inch Mark VII gun was moved from its original emplacement to the reconstructed 6-inch BL emplacement at the northern end of the Fort, with an anti-strafing cover.
In 1947 the 6-inch guns were removed from Beacon Hill but the twin 6-pounder was retained until 1956 when the fort was decommissioned and all the artillery was removed. Although there was an occasional military presence through the 1960’s and 1970’s the site deteriorated quickly with anything saleable being removed and sold for scrap.
Numerous buildings from all periods from 1889 onwards are still standing at Beacon Hill. The site is owned by the council and although easily accessible it is not officially open to the public and is not maintained in any way. The main paths through the site are well defined but some parts are heavily overgrown, especially in summer and in wet weather the ground can be very muddy.
All the buildings and underground magazines are open and accessible with the exception of the RDF tower. Some however are in a dangerous condition and should only be entered with extreme care, especially the two towers which have external stairs and the magazines which are dark and strewn with rubble and rubbish. There are numerous trip hazards including open gullies and drains and they should not be entered without adequate lighting and footwear.
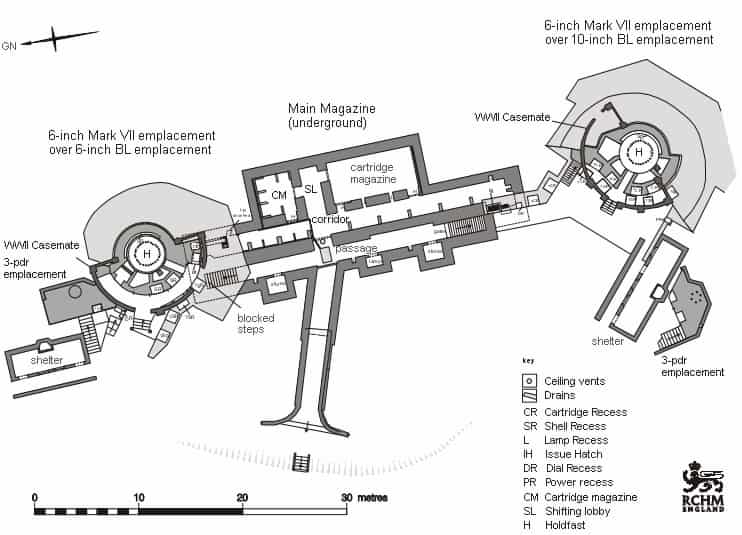
TWO 6-INCH MARK VII EMPLACEMENTS & MAGAZINE
The northern emplacement is built of concrete with a 3.78 metre diameter gun pit, a semi-circular gun floor at the rear and a sloping apron at the front. There is a shell recess around the front face and four ready use ammunition lockers beneath the gun floor at the rear.
There are a further four lockers set into a second platform at the back of the emplacement, some of these have evidence of metal doors. There is a fifth locker in the north wing wall. A concrete casemate with a flat roof was added for protection against an air attack during the early years of WW2. The side walls of this structure are corrugated and internally buttressed. The roof originally extended over the gun pit itself but this section has now broken away.
At the back of the casemate access is through a door at the top of a short flight of steps; a second set of steps leads down to a second blocked doorway into the casemate. A Bofors anti-aircraft gun was located on the roof of the casemate with metal stairs for access. These stairs have now gone but on the roof of the casemate the holdfast bolts are still visible together with a safety rail across the front.
The southern emplacement is also well preserved and consists of a 3.78 metre diameter gun pit with a semi-circular gun floor at the rear and a sloping apron to the front. Sections of the original 1890 emplacement including part of the pit and the sloping apron have been incorporated into the later conversion. There is a shell recess in the front face and three ready use ammunition lockers under the gun floor to the rear, two of them with evidence of metal doors.
There are two openings for ammunition lifts from the main magazine located underground between the two emplacements. One is for a band lift for shells while the other, on the opposite side of the emplacements, was a vertical lift for cartridges.
In the rear wall of the emplacement there are two further ready-use ammunition lockers with frames for double doors.
A concrete casemate with a flat roof was added for protection against an air attack during the early years of WW2. This is similar to the adjacent emplacement with the addition of a porch at the entrance door. There was no anti-aircraft gun on the roof.
The original 1890 underground magazine survives between the two emplacements; it was adapted for use with the later 6-inch guns with numerous alterations being made.
The main entrance to the magazine is down an inclined ramp in a concrete lined cutting, through a pair of double metal gates into a short barrel-vaulted passage. After a short distance this passage enters a north - south corridor close to the northern end. At the southern end of this passage there are double gates and steps up to the southern emplacement. At the northern end there are steps up into the gun pit of the northern emplacement. These steps have been blocked at the top, probably during the later conversion.
On the western side of the passage there are three rooms, two stores and one for lamps; each has a lamp recess in the wall beside the doorways. On the east side of the passage opposite the entrance tunnel there is a doorway into a second, parallel north-south corridor. At the southern end of this passage there is an offset area to the right with the remains for a vertical cartridge lift to the emplacement above with the winch mechanism still in place. At the northern end of the passage there is an inclined band lift for the shells with the drive chain, loading mechanism and winder are all still in place. There are also four lamp recesses in the wall.
In the main corridor there are a number of concrete pillars that would originally have supported wooden shelving for the storage of shells. An original sign can still be seen identifying ‘Shell Store 2’.
The two cartridge magazines are located on the east side of the corridor; they are entered through a shifting lobby situated between them. Outside clothing was removed in the shifting lobby and special ‘safe’ magazine clothing would be put on. Cartridges were passed into the main corridor through ‘issues hatches’, two in the larger southern magazine and one in the smaller northern magazine. Lighting in the larger magazine was provided by two glazed lamp recesses located between the magazine and the corridor.
3-POUNDER QF EMPLACEMENTS & MAGAZINE
3-pounder QF emplacements were built in 1898 with the guns providing flanking fire for the 10-inch and 6-inch BL guns. One is located on the north side of the 6-inch emplacement and the other a few yards west of the 10-inch emplacement.
The northern emplacement consists of a concrete gun floor accessed by a short flight of steps on its east side. A ready ammunition locker survives in the rear wall. The southern emplacement is similar with two ready ammunition lockers surviving.
Ammunition was stored underground in the ‘Kingsgate Magazine’ which is located a few yards to the south of the Bombproof Shelter. It is entered by a ladder next to a davit for a crane hoist and consists of an entrance passage and a single vaulted room.
4.7-INCH QUICK-FIRING (QF) EMPLACEMENTS & MAGAZINES
In 1892 two 4.7-inch QF emplacements with underground magazines were built. The southern emplacement with its magazine is largely intact but the northern emplacement was used as the foundation for the 1941 battery observation post
The southern emplacement consists of a gun floor, a semi-circular wall and sloping apron at the front and wing walls on the flanks. The gun floor stands 1.34m high with access by a flight of steps protected by the north wing wall
Three ready-use ammunition lockers are set into the back of the gun floor accessed by a short flight of steps. There is a fourth locker on the southern side
The magazine is on the south west side of the emplacement and consists of three rooms at the bottom of a curving flight of steps. The first room is a lobby which leads into the shell store which in turn leads into the cartridge store. Both magazines originally had light recesses in the walls but the recess in the cartridge store has been removed.
Although the northern emplacement is partially intact it is almost completely obscured by the battery observation post that has been built on top of it. The northern magazine is still accessible and is identical and in a similar condition to the southern magazine.
6-INCH BL AND LATER 6-INCH MARK VII GUN EMPLACEMENTS & MAGAZINE
In 1901 a 6-inch BL gun emplacement was built together with a magazine and shelter. Very little now survives of this emplacement as it was largely demolished during the construction of a 6-inch Mark VII emplacement in 1941. Sections of the gun floor and flanking wall can be identified and a cartridge lift with much of its mechanism intact still survives. The Mark VII structure incorporates a rectangular concrete casemate which stands to the rear of the emplacement; it has an access doorway through the rear wall. The concrete roof is strengthened with iron girders as defence against an air attack. Five ready use ammunition lockers are located against the back wall. Two sets of steps lead up from the casemate to the emplacement where there are a further five ready-use ammunition lockers at the rear, some retaining the framework for double metal doors.
The gun pit is 7.5 metres in diameter and is partially covered by a circular platform supported on concrete pillars. The holdfast bolts for guns are still in place in two concentric circles.
Because of its exposed position and likelihood of erosion six tiers of concentric concrete buttressing were added to the front of the emplacement in 1944 but these haven’t prevented some cracking of the structure.
Behind the casemate there is a 10 metre long covered way to the top of an ammunition lift from the magazine below. Ammunition brought up from the magazine would have been loaded on to trolleys and pushed to the ready use lockers in the casemate. There is a sign on the wall which reads ‘A3 Emplacement’.
The 1901 underground magazine to the south side of the emplacement survives although it is much altered following conversion for use with the later Mark VII gun. There is a single entrance with a sign above the door that says ‘A2 Magazine’ The building is divided into three rooms, a shifting lobby, shell store and cartridge store. The shell store is just inside the entrance and occupies the west side of the building, and at the far end the original metal and timber mechanism for a band ammunition lift still survives.
The shifting lobby is directly in front of the entrance and still retains a seat and coat hooks. The cartridge store is reached by passing through the shifting lobby. An issue hatch with a sliding wooden door still survives as do two lamp recesses between the two stores
A gun crew shelter also built in 1901 stands to the west of the magazine and at the north west corner of the casemate there is a concrete pillbox with a gun pit for an anti-aircraft gun on the roof. The pillbox is similar in style to a standard Type 27 but hexagonal rather than octagonal.
PRACTICE BATTERY FOR 64-POUNDERS RML’s & MAGAZINE
In about 1894 a practice battery was built at the southern end of the promontory. The emplacement was probably for three 64-pounder RML’s and consists of a rectangular level concrete gun floor with a low concrete wall around three sides. Behind each of the open embrasures there are four concentric semi-circular iron racers set into the concrete; these allowed the guns to traverse on their carriages.
An underground magazine still exists some 75 yards to the west. A flight of steps gives access to two rooms from a short corridor. The first room was the shell store and the second room was the cartridge store which was entered through a small shifting lobby. There are two lamp recesses between the shell store and the cartridge store and one between the shell store and the shifting lobby.
CORNWALLIS BATTERY - TWIN 6-POUNDER EMPLACEMENT
The Cornwallis Battery was built in 1941 on the south side of the 1890 10-inch BL emplacement. It is a self contained unit consisting of a casemated gun emplacement, a BOP tower, crew shelter and an underground magazine.
The gun pit is circular at the rear and angled at the front and has a large spent cartridge recess in the rear face. The pit still retains bolts for the holdfast and has a raised gunners platform at the rear. Behind the gun pit is a semi-circular gun floor with two concentric metal rails on which ammunition trolleys were wheeled to the breech of the guns. To the rear there are five ready-use ammunition lockers with remains of double metal doors still in place. The gun floor is accessed by a short flight of steps from the casemate.
The casemate has been strengthened on the seaward facing side and has a flat concrete roof covered with asphalt; it still retains some camouflage paint. Access is through a doorway in the south-west face at the top of a short flight of steps. There was a vertical ammunition lift just inside the entrance but this has been blocked off.
The brick built crew shelter is on the north side of the casemate through a linking doorway and from steps up to a doorway on the west side.
The Battery Observation Post (BOP) was located within a four storey concrete tower with each floor consisting of a single room with a heavy metal door at the rear. The lower floor has a doorway at ground level while the upper three floors are accessed by external steps. A sign on the wall close to the bottom of the steps says ‘6 PDR BOP’
The upper two rooms have observation embrasures in the south-west wall and along part of the adjoining walls with remains of internal shutters surviving. The lower room was the searchlight direction station and the top floor room retains a concrete pillar where the coast director instrument for controlling the guns was mounted.
The magazine consists of a rectangular underground chamber accessed by a flight of steps. There is a doorway into a single room used for both cartridges and shells. At the eastern end there is an opening in the roof for the ammunition lift but no evidence of the lift remains. Ammunition reached the magazine down an inclined chute into the lobby, this remains in place with outward opening metal doors at the top
ELECTRIC LIGHT ENGINE HOUSE & BOMB PROOF SHELTER
The longest underground structure on the site is located in woodland on the west side of the fort. The electric light engine house and bombproof shelter was built in 1890; the engine was originally designed to power the searchlights but later provided all the power for the fort.
The structure consists of a 33 metre long vaulted chamber described as a ‘Bomb proof shelter’ for the infantry troops defending the Twydall Profile. On the east side of the chamber there are two rooms, the smaller room to the north was the coal store and the larger was the engine room.
There are two entrances on the west side of the shelter; the north entrance consists of steps down into an open forecourt from where double metal gates lead into a short entrance tunnel into west side of the main corridor close to the northern end. The southern entrance is also down a flight of steps; turning right at the bottom there is a second pair of metal gates and a short passage directly in to the southern end of the shelter.
In the middle of the chamber, on the west side, a short side passage leads to a vertical shaft that was originally fitted with a ladder. As there is a good view of the ‘Twydall Profile’ and the surrounding land at this point it has been suggested that the ladder led up to a command and control position.
The engine room still retains two concrete engine beds, one for the original steam engine and dynamo and the second for the later oil fired engine that was installed in 1903. This remained in use until a new engine room was built in 25 yards to the north in 1942.
COAST ARTILLERY SEARCHLIGHTS
Two searchlight emplacements are located at the base of the forts southern rampart and accessed by a flight of steps in front of the practice battery. Both emplacements are identical with an entrance at the rear and two vertical slit embrasures at the front with remains of sliding shutters.
BATTERY OBSERVATION POST
In 1941 a three storey concrete tower was built on top of one of the 4.7-inch QF emplacements. External steps give access to each of the floors through a metal door. The lower floor was a telephone room with high level horizontal slit windows. The middle floor was for the officer in charge of the BOP. It retains some electrical fittings and windows with outwardly opening metal shutters.
The upper room has an observation embrasure along the length of the south-east wall and partly along the adjoining walls. In the eastern corner there is a concrete pillar for a depression range finding instrument; bolts on the floor behind the pillar were the mountings for a plotting table.
SPIGOT MORTAR EMPLACEMENTS
There were five 29mm spigot mortar emplacements located around the fort. Four of them are still extant and consist of a gun pit with a circular concrete pedestal with a stainless steel gun pivot on top. They are surrounded by four ready use ammunition lockers with access into the gun pit down a short flight of steps between the lockers.
The four extant emplacements are: one in the south-west corner of the fort, one close to the engine room, one to the south of a defence electric light emplacement just outside the fort to the north and one to the north of the northern position finding cell.
EXTENDED DEFENCE OFFICERS (EXDO) POST
An EXDO post for marine minefield control is located at the southern tip of the promontory which, during WW2, was under naval command. It has been built on top of an earlier pillbox precisely matching its dimensions and consisting of an irregular pentagon. The pillbox was retained for its original purpose although the original rear entrance was blocked and the only access now is down a ladder from a narrow passage at the rear of the EXDO post.
The EXDO post consists of two rooms, the larger was the chart and communications room and the smaller, a crew room. There is a small observation embrasure with fittings for shutters with an external concrete canopy above it. There is also a small turret projecting from the ceiling which also has an observation embrasure.
Several buildings stand on the shoreline to the north of the fort but outside the perimeter fence. These include four position finding cells that were probably in use by 1895. These were able to calculate triangulation in conjunction with two similar structures at Dovercourt to the south of Harwich. The most prominent feature in this area is a brick built
RADIO DIRECTION FINDING TOWER
This was built in 1940 and was part of the programme to develop radio direction finding and was used in conjunction with the 6-inch guns on the fort providing gunners with bearings on their targets.
The building is Hexagonal in shape with three storeys. The ground floor is divided into four rooms with three horizontal shuttered windows with larger shuttered windows on the first floor. Some of the radio direction finding arrays are still in place on the upper floor but the building is fenced and locked with no public access.
Numerous other buildings are still standing within the fort and just outside the perimeter including the guardhouse, artillery store, workshops, depression range finding posts, shelters, pillboxes, latrines, petrol store, oil store, observation post, engine house, gun store and slit trenches. Much of the unclimbable Dacoit fence around the perimeter also still stands although there are plenty of gaps in it for easy access to the site.
The remaining buildings all date from 1889 onwards; many have been altered, some quite radically during later modifications to the fort especially during WW2. No evidence survives of the earlier fortifications at Beacon Hill as most of them, like the original 17th century blockhouse, have been washed away by coastal erosion.
Sources:
- Archaeological Field Survey Report BEACON HILL FORT, ESSEX by Moraig Nrown and Paul Pattison. Published by Royal Commission on the Historical Monuments of England (English Heritage). Copies of the report available from English Heritage contact amanda.atton@english-heritage.org.uk
- East of England Tank Museum
- Harwich Maritime Heritage Trail