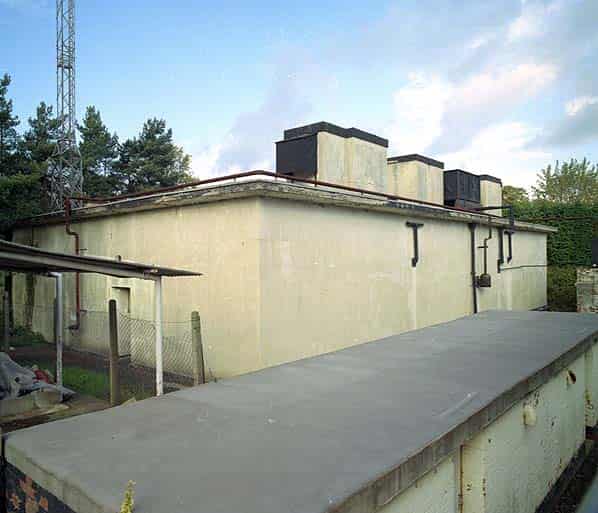
The Region 2 Leeds War Room is located on a government estate at Lawnswood on the East side of Otley Road and although the estate consists of a multitude of single storey ‘H’ blocks the war room is difficult to see from the road as it is of the semi-sunk variety (one floor above ground and the other below) and surrounded by tall trees. It is given away by a communications mast on the roof.
The War Room opened in the early 1950’s but within a few years nuclear technology left it obsolete as the H bomb threat required a new breed of protected accommodation, the RSG. By 1958 it had became a sub regional control, subordinate to the RSG at York. It also acted as a Leeds City Council sub control, one of 4 in a ring around the city. (the others were houses). Joint Home Office and Civil Defence use is unusual. After 1968 it was no longer required until 1981 when the upper level was refitted as Leeds City Council Control (The lower level was not used). In theory it was available until the end of the cold war, but in practice it was unsuitable for the purpose, damp and rarely used. It is now empty and unused.
The building is still in good external condition within its own locked compound. It is painted cream with three prominent ventilation towers on the east side and an external fixed ladder onto the roof. There are two surface air raid shelters (also painted cream) just outside the eastern perimeter fence.
The two entrance doorways are in the north and south faces of the building. We entered through the north entrance which consists of a wooden door flush with the wall which opens into a short dog leg lobby at the end of which is a heavy steel blast door. Beyond this is the male toilet, identical in layout to other war rooms with 3 hand basins, 3 WC cubicles (curtains removed), 4 urinals, a shower and two water heaters.
Beyond the male toilet the passage opens into the upper ring corridor, most of the corridor lighting was found to be working as was the lighting in some of the rooms on this level. Moving round the corridor to the left, the first door on the outside of the corridor is the power room. The standby batteries have gone although the battery charger is still in place. There is also a large control cabinet for the standby generator and various electrical boxes and switchgear. The generator itself appears larger than usual and is housed within its own small room within the power room. There is a time switch on the wall connected to a battery charger to ensure the starter batteries are kept charged. Over the years the generator has been started regularly. There is a linking door through to the ventilation plant room with all the ventilation trunking, filters and the fan still in place and in good condition. The room also acts as a work shop with a work bench with some spares scattered around. There are two framed charts on the wall.
From this room a door leads back into the ring corridor. As the corridor turns through ninety degrees there is a short passage leading to the second blast door with the female toilet off this passage. The female toilet has two water heaters, 4 hand basins, 4 WC cubicles (with curtains removed) and a shower.
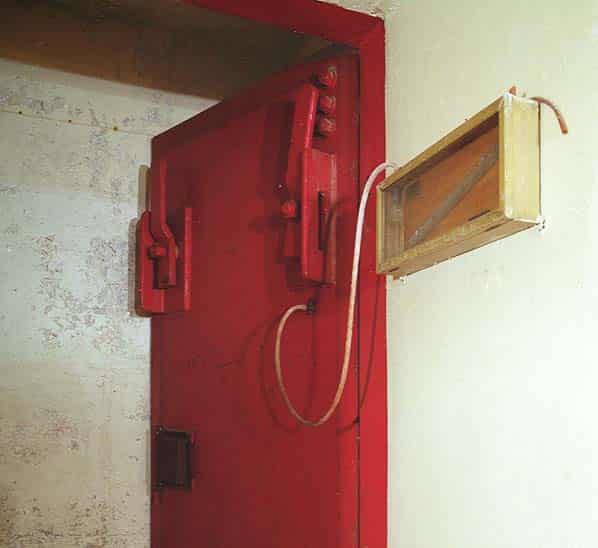
The rear blast door has an overpressure gauge mounted on the wall alongside. This consists of a rubber tube which passes through the door; this is connected to a glass tube with a coloured liquid in it. Mounted alongside the tube is a graduated and calibrated rule. The liquid reacts to the pressure which can be read on the rule. There is a notice instructing people not to tamper with or remove the rule.
Beyond the stairs down to the lower level is a room with an intriguing message handling system for passing paper messages to the floor below. It consists of a wire basket and a system of ropes and pulleys for lowering the basket to the lower corridor. The basket locks in position in the upper room but can be released by pulling on the rope from below. The system is manufactured by Lamson who are better known for the ‘Lamson Tube’ a pneumatic message handling system used in many government buildings and still used in some department stores. One section of cord (down to the lower level) has perished and broken off. The basket can still be lowered and raised but only from the upper room. Similar message baskets still exist at the Brislington & Birmingham war rooms. There is a key cabinet on the wall but all the keys are loose on a table.
There are a further three rooms along this length of corridor, one appears to be a strong room and is locked, the other two are empty apart from filing cabinets, chairs and map/plan drawer. The corridor turns through 90 degrees and opens out into the kitchen/canteen. The kitchen area is at one end it has a long counter/preparation area, butler sink with two draining boards, a water heater and two plate racks. In the canteen area there are six tables and a locked floor standing metal cabinet. At the far end of the canteen is the final part of the upper ring corridor.
On the outer side of the corridor are three rooms that have been used for storage and still contain some architects models and furniture. Beyond these rooms is the second stairway down to the lower level. On the inner side of this corridor a door leads into one of two rooms with curved glass windows (designed to cut out reflection) overlooking the well below. This was the control room and is is the larger of the two rooms with its two windows still in place. There are 6 chairs and 4 Dexion racks containing files, plans and maps. Many of the maps (large scale ordnance survey) are strewn across the floor here and in several other rooms. The smaller of the two rooms is accessed from the control room and the ring corridor has had its window removed and boarded over. This appears to have been converted into a signals room with evidence of 6 acoustic booths (now removed) each with its own light.
The lower floor is flooded throughout to a depth of one foot; it also has a ring corridor. The two level operations room in the centre still retains a large angled wall board for the main map (now gone) with a step ladder for reaching the top sections of it; alongside this is a resources blackboard. On one wall there is a WB1400 carrier receiver and loudspeaker. The only remaining furniture is a single swivel chair and a rack of floor standing shelves.
Three small rooms with curved glass windows look into the operations room along one side, two of these are empty, the other still has two teleprinter tables with chairs. There would have been a fourth room with a window at one end but the window and frame has been removed to make a walk-through access into this room.
As with the upper floor, the ring corridor opens into a large rectangular room directly under the canteen. A sign on the door indicates this was a conference room and it still has chairs around all the walls. It has a message-passing window into the operations room, and two other adjoining rooms. There are five rooms accessed from the outside of the ring corridor, two are tank rooms and another is the GPO switchboard room which still retains a large switching frame and various wall boxes. The message basket is located in an alcove in the corridor wall.
Throughout the building is damp with paint peeling from the walls in places.
Those taking part in the visit were Nick Catford, Robin Ware, Keith Ward, Bob Jenner, Robin Cherry & Wayne Davies.