")
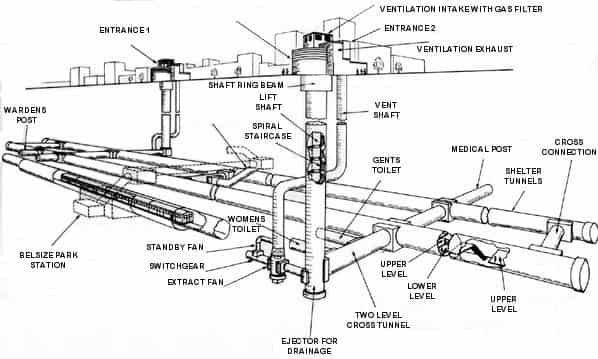
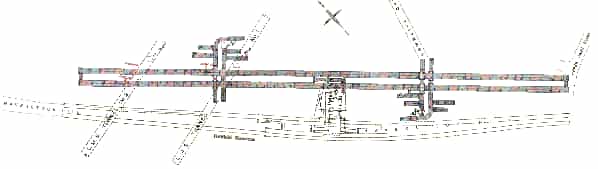
The Bombings of 1940 forced a reappraisal of deep-shelter policy and at the end of October the Government decided to construct a system of deep shelters linked to existing tube stations. London Transport was consulted about the sites and required to build the tunnels at the public expense with the understanding that they were to have the option of taking them over for railway use after the war. With the latter point in mind, positions were chosen on routes of possible north-south and east-west express tube railways. It was decided that each shelter would comprise two parallel tubes 16 foot 6 inches internal diameter and 12,000 feet long and would be placed below existing station tunnels at Clapham South, Clapham Common, Clapham North, Stockwell, Oval, Goodge Street, Camden Town, Belsize Park, Chancery Lane and St. Pauls.
It may be assumed that at these points the deep-level express tubes would have no stations as the diameter was too small. Each tube would have two decks, fully equipped with bunks, medical posts, kitchens and sanitation and each installation would accommodate 9,600 people.
All the deep level shelters were sub-divided into sleeping areas. Each tunnel was divided into 4 sections with connecting doors between them. Each section was given a name. At Belsize Park the northern entrance sections (i.e. those accessed directly from the northern lift without crossing to the other side) were named: Godley, Baden-Powell, Frobisher, Ashurst, Scott, Livingstone, Rhodes & Kimberley while those accessed from the southern entrance were: Cook, Hudson, Dampier, Jameson, Milner, Vancouver, Phillip, Wolfe. Only one tunnel (accessed from the northern entrance) was ever used as a shelter. Each section had bunks fitted longditudanally along the outer wall, a single at the top, a double in the middle and a single at the bottom. Along the inner wall bunks were fitted across the passage forming bays. There were 4,380 bunks in total and each bunk was allocated to a named person. If they didn’t turn up one night the bunk remained unused. The southern tunnel was reserved for other, unrecorded government uses. (PRO file HO205/191-82364)
After the war, various uses were found for the Government deep shelters, including the storage of documents.
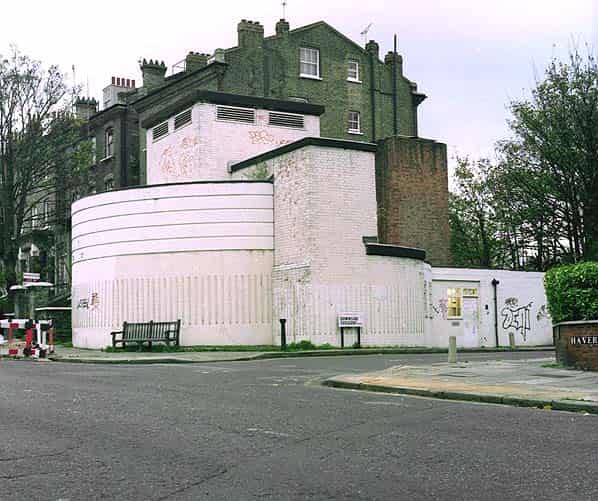
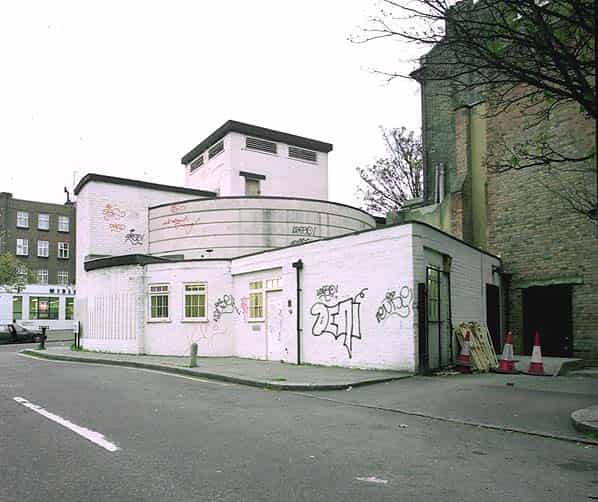
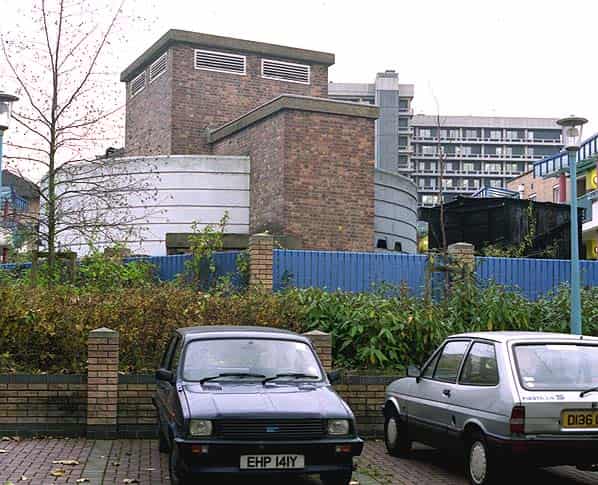
Like most of the Deep Level Shelters at the surface, Belsize Park consists of two circular turrets, which give access to a lift shaft and spiral staircase down to the twin tunnels below. The northern entrance is behind 210 Haverstock Hill, NW3 at the end of a drive alongside Flourstalk Florists. It’s within a small compound that is used as a car park by the data storage company who now lease the tunnels from London Underground. This entrance also serves as the emergency access point. The main structure is the concrete turret, now painted white with small brick extensions on two sides, which were the original doors. A square brick structure on top of the turret is the ventilation intake shaft with the open exhaust shaft 10 yards in front of the turret surrounded by corrugated iron sheeting. There is a door in one side with a metal beam, which could have been used with a rope and pulley for lowering heavy items into the tunnels below. A few yards to the west is a low concrete structure with a trap door ion the top. This was probably a fuel tank. (A modern circular ventilation shaft nearby serves Belsize Park tube station).
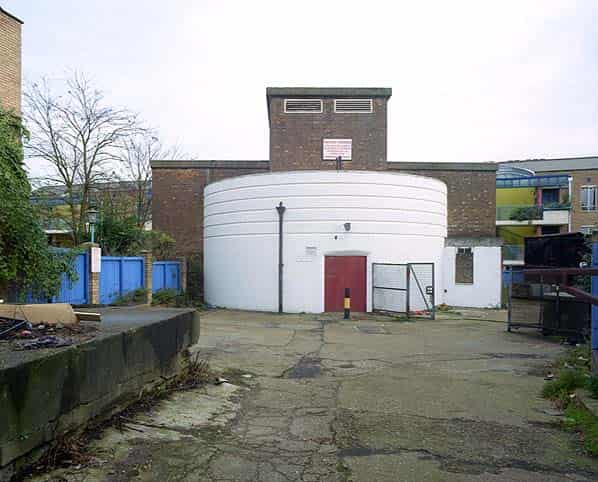
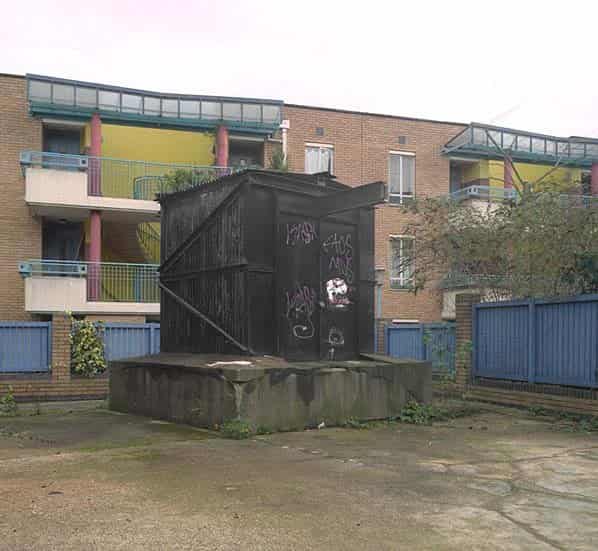
The southern entrance is at the junction of Haverstock Hill and Downside Crescent and is used for access by the data storage company. It consists of a similar circular turret with a brick ventilation intakes shaft on the roof and brick extensions on two sides for the entrances. The exhaust ventilation shaft comes up into a 25-foot high brick tower in the yard to the rear of the turret. There is a door into the bottom of the tower. To the east there is a low rectangular structure with a trap door, which was probably a fuel tank.
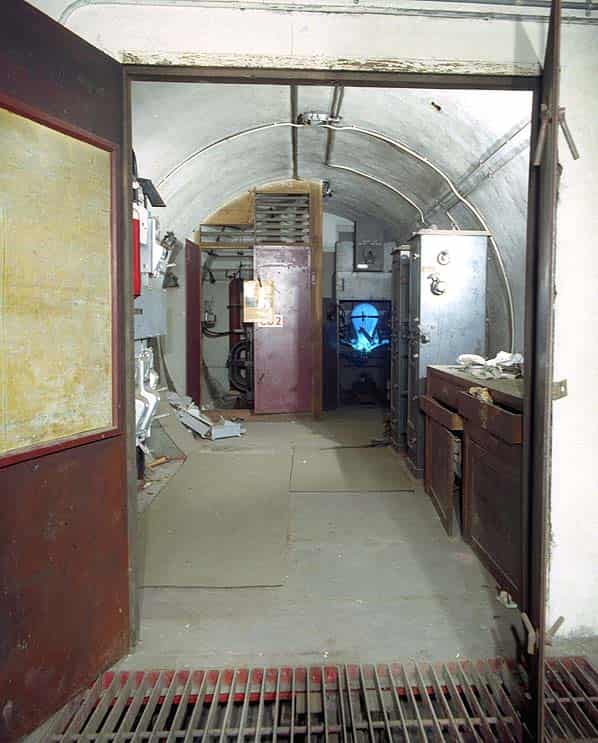
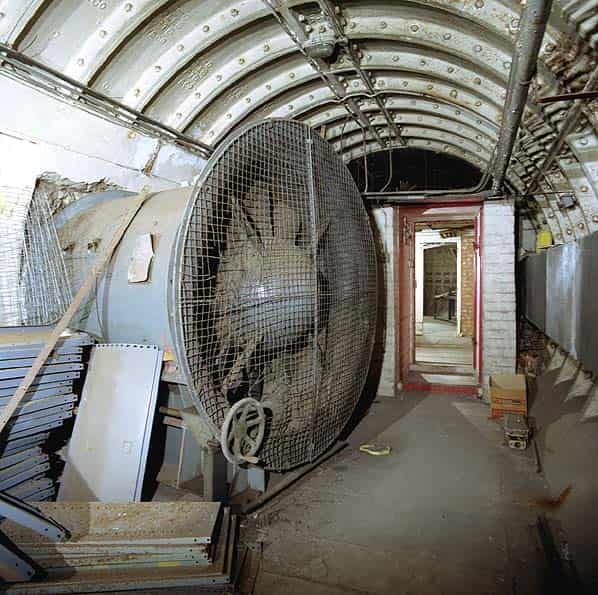
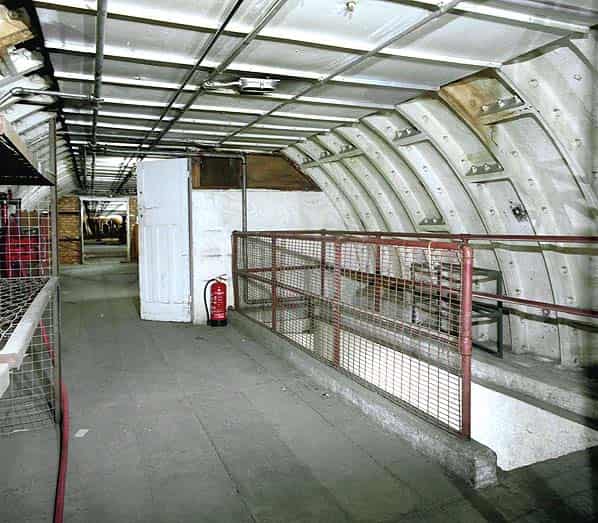
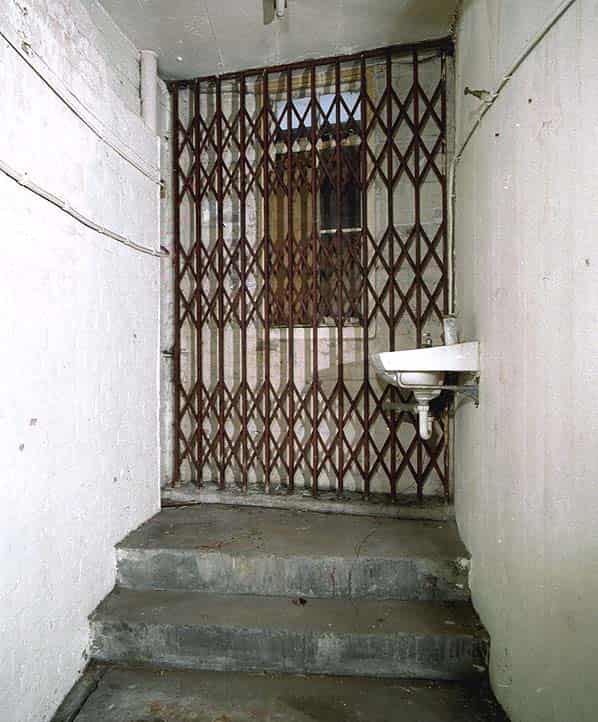
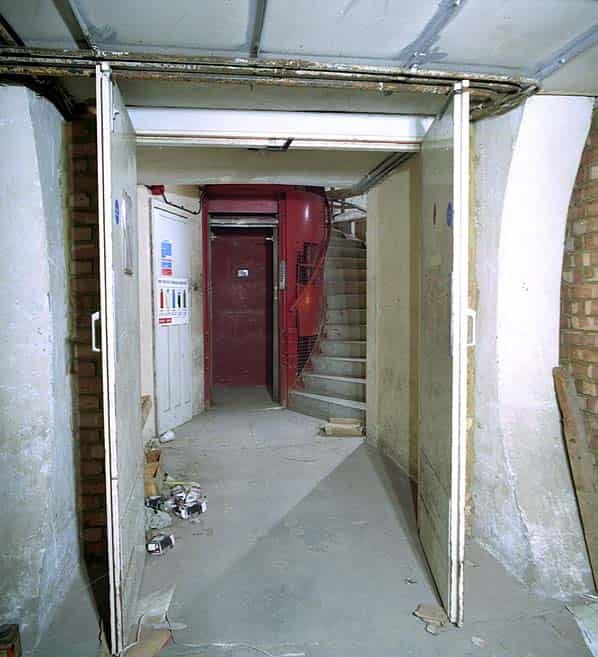
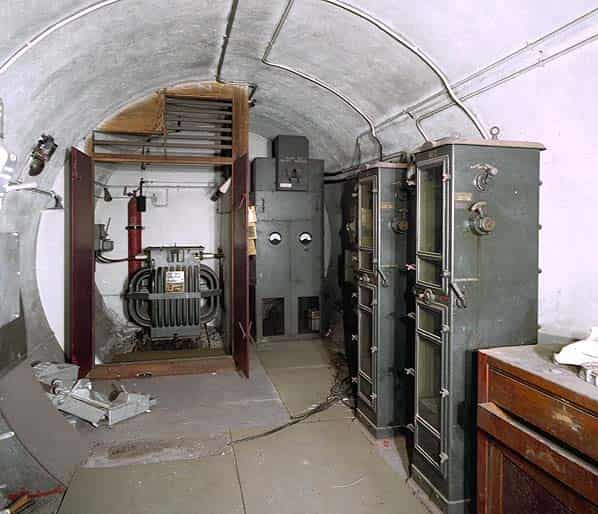
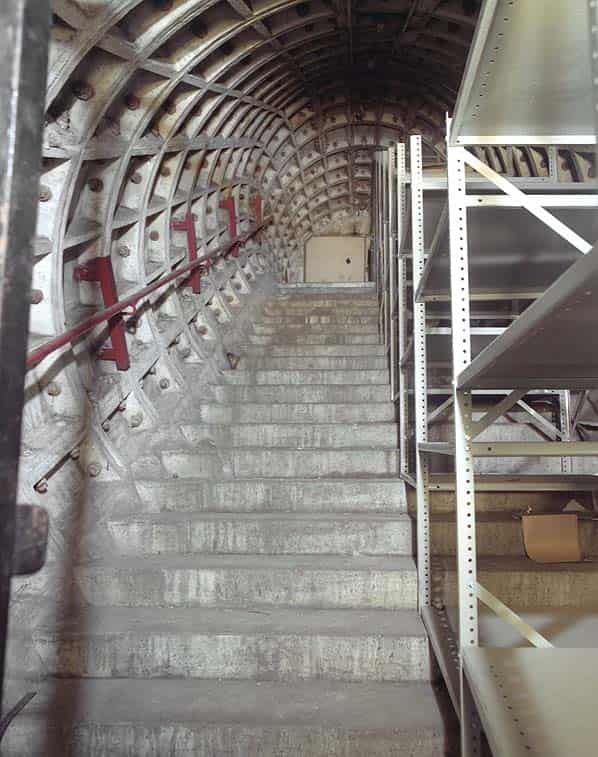
Inside the northern turret the original entrances have been bricked up with two steps leading to a sliding metal grille and then a brick wall with a small window in the top. There is a sink at the bottom of the steps. The circular turret has the lift shaft running down the centre, which also acts as the ventilation intake shaft through the raised brick blockhouse with ventilation louvres on the roof. A circular corridor runs around the top of the lift shaft with two stairways winding down around it, one leading to the upper landing and the other to the lower landing 140 feet below. The stairs to the lower landing are out of use and accessed through a trap door on the floor. The lift is in working order though rarely used. At the bottom of the lift shaft on the upper landing there was no lighting, as the wiring in this part of the tunnels is considered unsafe. Turning right leads first to the extract fan and then into the switchgear room.
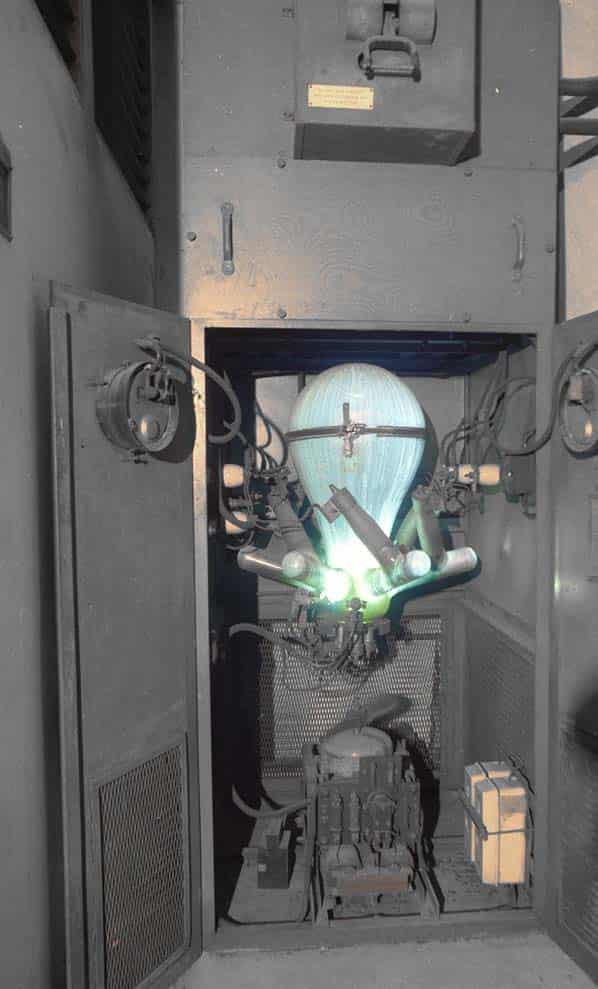
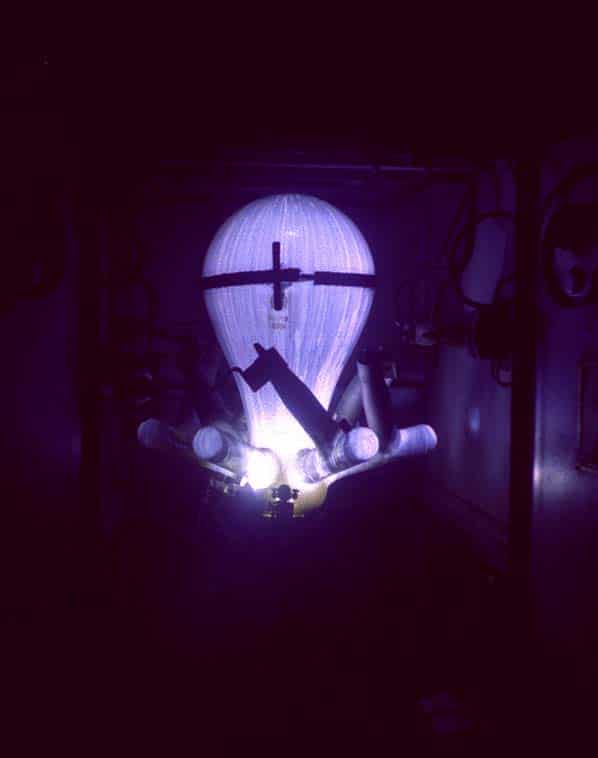
At he back of the room is another small room containing the transformer for powering the lift and beside it a metal cabinet containing a mercury arc rectifier.
This consists of a very large ‘valve’ standing about 15 inches high and shaped like an electric light bulb. At the base are a number of horizontal glass projections containing the ‘anodes’, which give this device the name ‘the octopus’. Both the transformer and the rectifier date from the 1940’s and are still working. The rectifier emits a vivid purple glow with electric arcs jumping about inside. The rectifier works because the electric arc between a pool of mercury and the metal anode will only allow current to pass in one direction. In an ‘octopus’ the multi-phase transformer produces an arc which jumps from the mercury pool (cathode) to each anode in sequence.
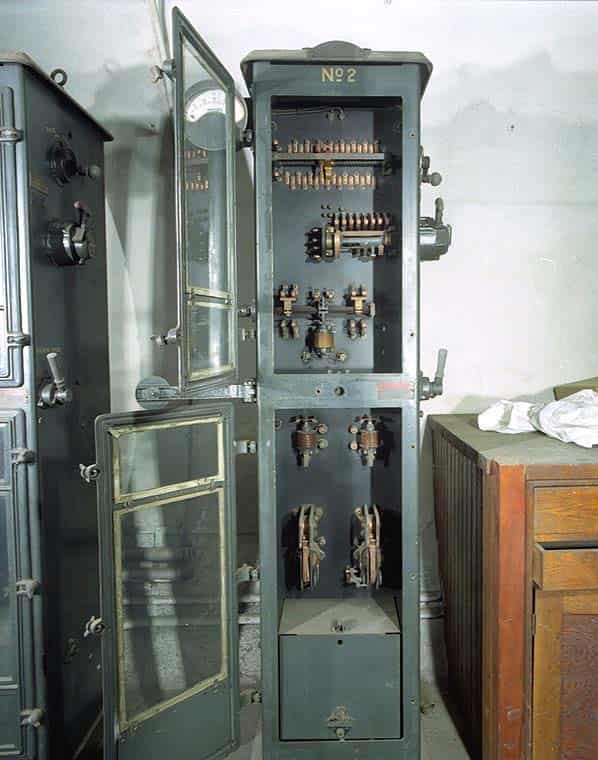
Along one wall is a bank of fuse boxes and switches and along the other wall two long floor-standing cabinets with glass front panels containing rheostats for controlling the speed of the fan. These two cabinets, which also date from the 1940’s, are now out of use.
Between the switchgear room and the extract fan is a large grating in the floor with a ladder leading down into the sump. At the bottom of this is a short passage leading to the bottom of the exhaust ventilation shaft. There is a very rusty trap door in the floor with water below it. Another tunnel leads to a small chamber containing pumps, partly submerged and a large tank, which may have been for sewage. Above is the bottom of the exhaust shaft and another small fan with a 15' rusty ladder to a landing above it. This gives access to a second corroded landing at the back of the extract fan. Above in the shaft is some winding gear of unknown use and above that the shaft is clear to the surface.
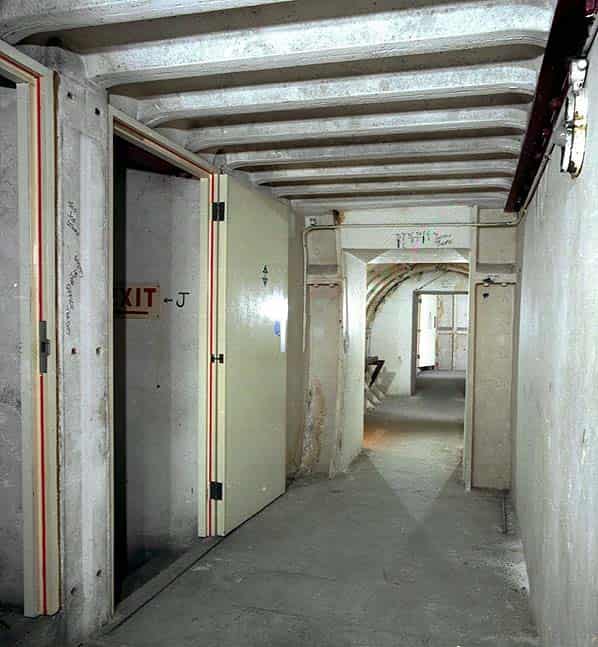
From the lift shaft the tunnel turns through 90 degrees with two rooms on the right hand side with a privacy wall in front of the entrance doorways. These were the ladies and gents toilets but no original fittings remain. Beyond the toilets this tunnel joins the upper deck of the first ‘shelter tunnel’ at right angles approximately one quarter way along the length. There are two parallel tunnels each divided into upper and lower decks. Each tunnel is partitioned into five sections with connecting doors. To the right (north) the tunnel was empty when inspected in January 2000 apart from rubbish and old shelving racks left by the previous occupier. There is a door in the end wall leading to a connecting corridor and a stairway down to the lower level. Back at the junction with the lift access tunnel, there is another cross passage linking the two parallel tunnels which ends in a short stub tunnel that once contained the medical post.
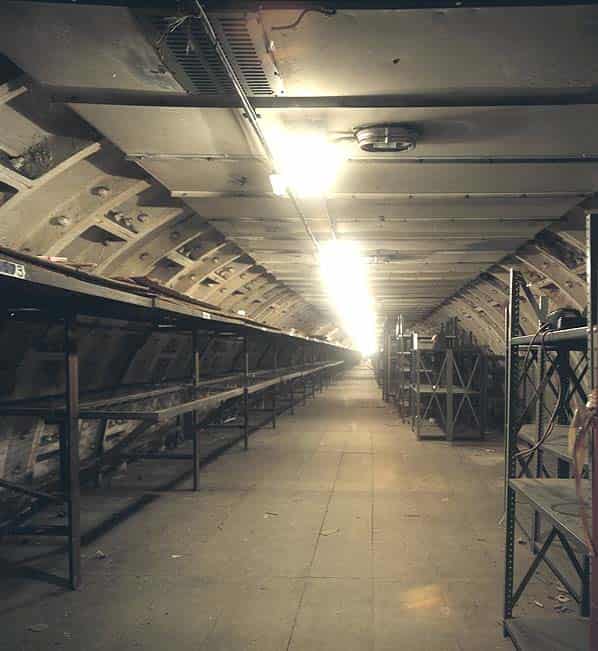
Turning left (south) along the first tunnel the right hand wall is lined with original metal-framed beds along its entire length, one above the other. The bottom bed being a double folding bunk while the upper bunk in the curve of the roof is single and fixed in position. Along the left hand wall are what at first glance appeared to be two lines of bunks one along the wall and one free standing a few feet into the passage. On closer inspection these appeared to be shelving constructed by a previous occupier from the original metal bed frames. A few yards along the tunnel on the left hand side is a stairway down to the lower level. Apart from the beds, this section of the tunnel is unused and unlit. (Spring 2000).
Aboutt half way along the full length of the parallel tunnels is another cross passage with a wide stairway leading down to the lower level and up about 20 feet, round a right angle bend to a brick wall - this was the connection through to Belsize Park Station. There appears to have been a small fire in this area at some time.
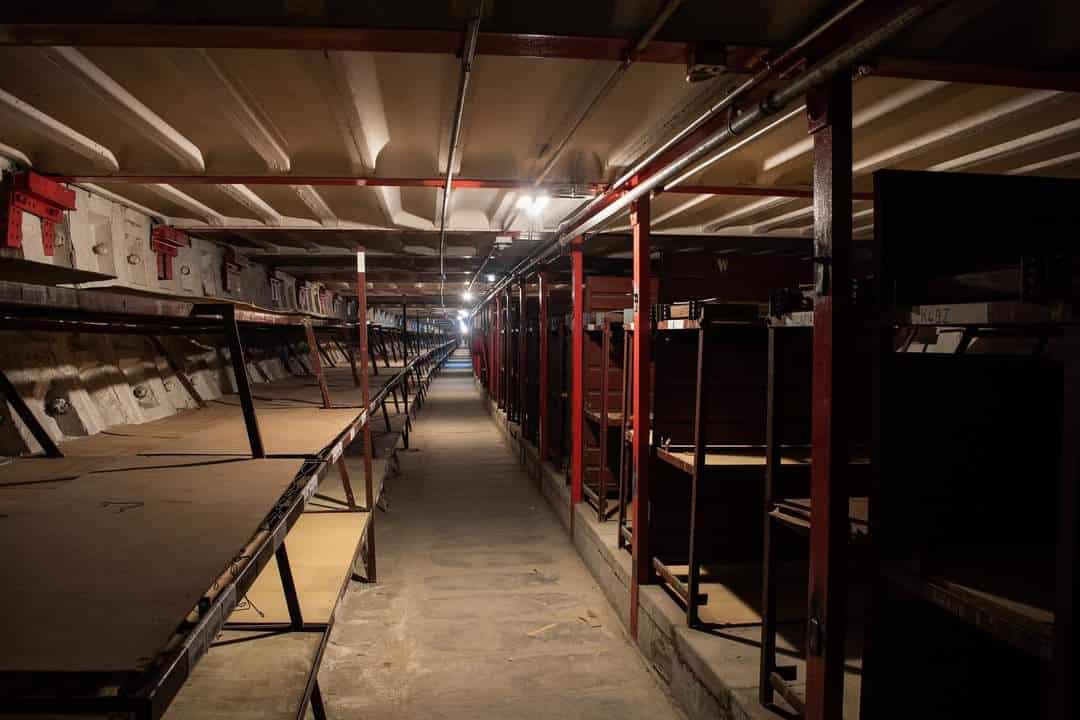
Returning to the shelter tunnel, from this point the tunnels are lit and in use for storage. The original bunks are have been retained along one wall with adapted bunks in use along the other. They are stacked with boxes of documents and video and computer tapes. At a point three quarters along the tunnel there is another cross passage with a small room on the left hand side that has been used as a workshop. The two tunnels continue ahead with another stairway linking the levels at the end. From the workshop there is a cross passage linking the two tunnels at both levels past two more ladies and gents toilets to a door on a right angle bend in the tunnel. Straight on leads to a second switchgear room with another extract fan, another grating in the floor, another transformer, another glowing mercury arc rectifier and another pair of rheostats. To the right leads to the bottom of the lift shaft and stairway to the surface.
At the top of the shaft is the lift room with the original control box (with a modern one inside it) and the motor, part of which was original. As well as the circular corridor around the lift shaft there are a number of other rooms now used as offices, store, kitchen etc. Throughout the tunnels the only original signs on the walls point to the exits and all the tunnel linings are embossed LPTB (London Passenger Transport Board).
The tunnels were photographed internally in January and March 2000, all photographs show the upper level only.